
In this guide, I will show you how to AirDrop from iPhone to Mac. The AirDrop service was introduced by Apple with the release of the Mac OS Lion (Mac OS X 10.7) and further release of iOS 7.
Airdrop is a useful utility when you want to share files between your Mac and iDevice. Before now, the way files was being shared was between one Mac and another Mac or between iOS devices only.
However, following the release of OS X Yosemite, it became possible for files to be shared between a Mac and an iOS device.
Read Also: How to Wipe an iPhone
With AirDrop, Apple users can share music, videos, photos, locations and various kinds of files over the air from one Apple device (e.g, iPhone) to another compatible Apple Device (e.g. Mac).
The technology being employed in AirDrop is a high speed protocol used to transmit data over WiFi and Bluetooth 4.0 between Apple device which are close to each other.
Table of Contents
Steps to AirDrop from iPhone to Mac
In this example, we are going to send photos via AirDrop from the photos app but it can be done anywhere where you find the “Sharing” menu. This is how it works:
STEP 1: Tap the Sharing icon (it resembles a little box with an arrow flying out of it) on the iPhone where you want to AirDrop, Here, we’re AirDropping photos from iPhone to a Mac.
![]()
STEP 2: Go to your Mac and open a Finder window. From The Finder window, select AirDrop from the sidebar. You can also do this by by pulling down the Go menu and choosing AirDrop.
STEP 3: Check on the Mac the “Allowed me to be discovered by” section. It should be denoted by Everyone or Contacts Only. Let the Finder window be kept open as AirDrop is enabled.
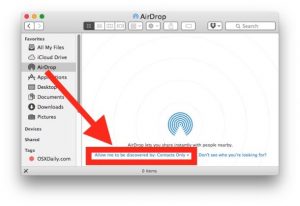
Image Credit: www.osxdaily.com
Read Also: How to Crop Videos on iPhone
STEP 4: On the screen for sharing on your iPhone, tap the AirDrop icon.
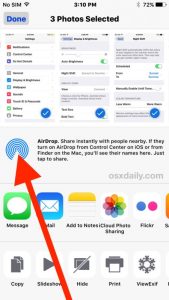
Image Credit: www.osxdaily.com
STEP 5: Wait for some seconds on your iPhone and you’ll see your Mac with AirDrop enabled appear on the list. Hit the user ID/ Mac to begin the transfer of files (or photos in our example) to the Mac.
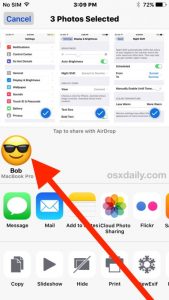
Image Credit: www.osxdaily.com
The files being AirDropped will transfer from the iPhone to the Mac. Upon completion of the transfer, you’ll hear a little sound effect from the Mac and the AirDropped files will be saved to the user’s Download folder.

Image Credit: www.osxdaily.com
No matter the kind of file being transferred through AirDrop, whether photo, videos or other types of data, the files usually go to the Download directory of the Mac. This is where AirDropped files go by default.
Problems You Might Encounter while using AirDrop
The following are problems you may meet when using AirDrop and their solutions:
Problem 1: Mac can’t find iPhone:
Restart the iPhone and Mac if you are facing this problem. If it does not still get solved, set to “Everyone” instead of “Contacts Only”.
Read Also: How to Change Apple ID on iPhone
Problem 2: AirDrop not showing in Control center
It was reported by some users that they could not find AirDrop in Control Center. This issue can easily be fixed. Just open the Settings app and get to the Restriction item to enable AirDrop service on your iPhone.
Problem 3: Can’t AirDrop music
This problem cannot be solve because Apple does not permit users to share music from iPhone to another device via AirDrop. There are limitations on the types of file that can be transferred through AirDrop. Under this circumstances, AirDrop only supports transferring videos, photos and locations.
Problem 4: AirDrop not showing up in Finder
There are only specific models of Mac that supports AirDrop. If you don’t have AirDrop in finder, it is possible that your Mac is not compatible with AirDrop. The Macs that support AirDrop are listed below:
* MacBook Pro (Late 2008 or newer)
* MacBook Air (Late 2010 or Newer)
* MacBook (Late 2008 or newer
* iMac (Early 2009 or newer)
* Mac mini (Mid 2010 or newer)
* Mac Pro (Early 2009 with Airport Extreme card or Mid 2010).
Other Mac computers that will support AirDrop should be modern and have a resent Mac OS or Mac OS X release, with Bluetooth.