
The iPhone is powerful due to it’s great functionality. With a top notch camera system, you’ll always want to take photos. Creating memories with pictures can be fun until you have a full memory iPhone.
You have two choices to make – either deleting some photos without backing up or deleting photos after backing up. You’ll prefer the second because you can have access to the photos you deleted from your iPhone.
A great way to have your photos in place is to transfer them from your iPhone to your computer. This may either be a PC or Mac. In this tutorial, we’ll give you different methods of transferring photos to your computer.
Table of Contents
How to Transfer Photos from iPhone to PC
There are various method of transferring photos to your PC which will be highlighted here.
- How to Transfer photos from iPhone from PC through Photos App
- How to Transfer photos from iPhone from PC through Windows Explorer
How to Transfer photos from iPhone through Photos App
Using a PC with an older version of Windows causes Auto-play to come up when you connect your iPhone to it using a USB cable. If you have a PC with Windows 8, the device will be detected and a pop-up will show with a message “Tap to choose what happens to this device”. Upon clicking on the pop-up, an option to import Photos and Videos will be provided. What would follow is similar to what you’ll find below. Should you be in doubt, check out for the Import button.
Our concentration here will be on moving photos from your iPhone to your computer. The PC is similar to Mac with it’s easy organization and import.
STEP 1: Connect your iPhone to the computer using the USB cable.
STEP 2: You should see an automatic launching of the Photos App. If it does not open, launch it via the Windows start menu or the search bar .
STEP 3: Locate the Import icon in the upper right corner of the Photos app and click it.

Image Credit: www.iphonelife.com
STEP 4: A pop-up will come up showing a new box with photos for transfer. Select the photos which you wish to import and click Continue.

Image Credit: www.iphonelife.com
STEP 5: You’ll get another pop-up that will show you the location where your photos will be saved. You can however change the location for your photos. If you wish, you can also check the box, Delete items from device after importing.
STEP 6: Click Import
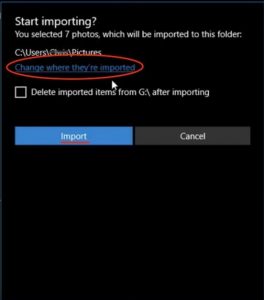
Image Credit: www.iphonelife.com
You can view your photos in the Collection menu after importation or to view specific albums, select the Album icon on the left sidebar.
How to Transfer photos from iPhone through Windows Explorer
The iPhone is treated as a digital camera or file system when connected to Windows. It is therefore possible to transfer photos from iPhone to PC with Windows Explorer. Somethimg to note here is that Windows only import Camera Roll photos and your photos are displayed in a disordered manner.
STEP 1: Connect your iPhone to PC
STEP 2: Launch My Computer. Look for iPhone in the Portable Devices section
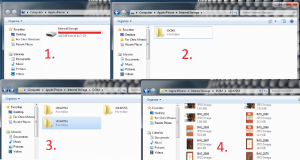
Image Credit: www.imobie.com
STEP 3: To open your iPhone, double click the iDevice icon. The Internal Storage icon will be displayed, open it by double clicking on it.
STEP 4: You’ll see the DCIM folder which is also the Camera Roll folder. Open it. Check for the folders that has the photos you wish to transfer. Select and copy those photos you want to transfer. Paste them in any folder you want.
How to Transfer Photos from iPhone to Mac
If you have a Mac, you sure can transfer photos from your iPhone in a less stressful manner.
- How to Transfer Photos from iPhone to Mac through Photos App
- How to Transfer Photos from iPhone to Mac through AirDrop
How to Transfer Photos from iPhone to Mac through Photos App
Built-in with your Mac, the Photos app makes Photo transfer easy.
STEP 1: Plug in your iPhone to your Mac
STEP 2: Your Mac may automatically open the Photos app but if it does not, launch it.
STEP 3: You should see iPhone under Import in the left navigation bar. Click the link.
STEP 4: Select the photos you wish to import and click the button labelled “Import 21 Selected” (depending on the number of photos you selected, the number can vary. Here we selected 21 photos.). If you wish to import or transfer all, you can click “Import All New Items” button.
![]()
Image Credit: www.iphonephotographyschool.com
How to Transfer Photos from iPhone to Mac through AirDro
With a Wifi network, AirDrop is a good option for you to transfer photos from your iPhone to your Mac. You’ll need a Mac made in 2012 or later and has OS Yosemite or later to use AirDrop.
First, ensure that your Mac and iPhone are both connected to the your WiFi network. You’ll see a small Wifi icon located at the top left corner of your iPhone screen. You’ll see the same icon at the top of your screen located closer to the right on your Mac.
Next, launch the Photos app on your iPhone and click Select and pick the image you want to transfer to your Mac. Locate the Share icon that is located down in the left corner and tap it. It appears like a box with an arrow pointing upward.
![]()
Image Credit: www.iphonephotographyschool.com
The option AirDrop appears at the menu top, down the selected photos icons. Hit the icon. Wait for some seconds and you should receive a message on your Mac telling you that it has received some photos from your iPhone
![]()
Image Credit: www.iphonephotographyschool.com
You can check the Downloads directory for your photos and if you like move them to where you want in your Mac.
![]()
Image Credit: www.iphonephotographyschool.com