In this guide, I will show you how to activate iPhone. You can activate your iPhone using Wi-Fi or iTunes. Here, we will show you how to activate iphone using itunes without sim.
Owning an iPhone is pretty exciting, thanks to the features iPhone has to offer. But what happens when you cannot begin to use it due to your not being able to activate it, problematic right?. Worry not, we’ve prepared this guide to help you.
Table of Contents
What To Do With an iPhone out of the box
You should first insert the SIM card or it might have been inserted by your carrier for you.
STEP 1: If your iPhone is not on, press and hold the Power On button and don’t release until the Apple logo appears.

Image Credit: wikihow.com
STEP 2: Select your language after tapping on the screen. Also select the country or region.
STEP 3: You’d be presented with two options. Select the one you want:
QUICK START: Choose this if you have an existing iPhone or iPad running iOS 11 which you should bring nearby to automatically sign in.
SET UP MANUALLY: If you are not with an iPhone or iPad nearby or you want to set up a different Apple ID, select this.
Read Also: 5 Steps to remove SIM card from iPhone
How to Activate iPhone with Wi-Fi
STEP 1: Open the Wi-Fi network and input the password. Proceed by tapping Next.

Image Credit: wikihow.com
STEP 2: Upon getting to the Face ID screen, tap Continue.
STEP 3: Instructions will be given on how to rotate your face along the designated area. Upon completion of the process, tap Continue. Facial Recognition is used by Face ID instead of a passcode.
STEP 4: You’d be taken to the Create a Passcode screen where you’d be required to re-enter a passcode. This is compulsory to setup Face ID.
STEP 5: Select an option that suits you:
- Restore from iCloud Backup
- Restore from iTunes Backup
- Set Up as New iPhone
- Move Data from Android
Read Also: 5 ways to transfer photos from iPhone to computer
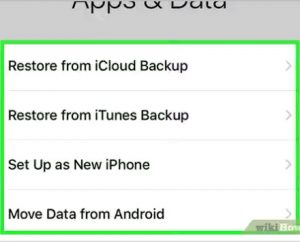
Image Credit: wikihow.com
STEP 6: Input your Apple ID and password and hit Next. If your Apple ID is already associated with another device, that device will receive a verification code. You have to enter this code to continue the activation. Perhaps you don’t have an Apple ID, go ahead and create one. If you can’t remember your Apple ID, then you’ll have to recover your Apple ID.
STEP 7: Next, you’ll be presented with the Terms and Conditions. Read through and click Agree to confirm.
STEP 8: You might be prompted, just tap Agree to Confirm.
STEP 9: You would be taken to the Express Settings Screen from where you are to choose one of the following:
- To use, tap Continue
- Customize Settings
STEP 10: Getting to the Siri screen, do one of the following:
- To use, tap Continue .
- Tap “Set up Later in Settings”
STEP 11: From the App Analytics page, select one of the following:
- Share with App Developers
- Don’t Share
STEP 12: Tap Choose a View
STEP 13: Getting to the Display screen, choose one of these options:
- Standard
- Zoomed
STEP 14: When you are through with selecting a display, tap Next.
STEP 15: Tap Get Started!
You have successfully completed the Activation of your iPhone.
Read Also: 4 Methods on How to delete apps on iPhone 7 & 7 Plus
How to Activate iPhone with iTunes
You can also use iTunes to activate your iPhone. Be sure you are running the latest version of iTunes.
STEP 1: Sig into iTunes with your Apple ID. Do this by clicking Account which is right there at the upper-left corner of the screen. Click sign in after which you’d be required to input your Apple ID credentials
STEP 2: Power on your iPhone and begin the set up process. You’ll be led to a screen to select you language and region.
STEP 3: Tap Connect to iTunes.
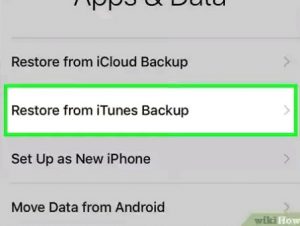
Image Credit: wikihow.com
STEP 4: Make a connection between your iPhone and Computer using a USB cable. The larger end of the cable plugs into your computer while the smaller end into your iPhone. iTunes should start automatically but if it does not, launch it.
STEP 5: Select Set up as new iPhone or Restore from this backup
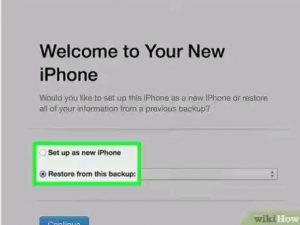
Image Credit: wikihow.com
STEP 6: Tap Get Started and aftwe that, click sync. This process synchronises your iPhone with your iTunes library making your iPhone activated. You’ll need an internet connection for this.
STEP 7: Complete the process and proceed to complete the set up of your iPhone. The set up will entail entering your Apple ID, creating a passcode, and setting various other preferences. Reaching the lock screen means you have successfully set up your iPhone.

Image Credit: wikihow.com